Kawaii Treatkins Printable Cuteness Part 2

What a great card style for kids. Even if they don't collect the shopkins characters or hello kitty items, this simple style is so kid friendly. It would be easy to make up a small supply to have on hand for birthday parties and school events.
 
The Treatkins include all cut files along with printable photos in 300dpi in both full color and black/white digi. Here's 4 more cards from Kristin using the Kawaii Treatkins printables.


Caramella Apple Treatkins


 If you missed part 1 of these Treatkins cards here's the link.
Have a delicious day! :)
 
~Val

Kawaii Treatkins Printable Cuteness Part 1

Kawaii is a style of "cuteness" that is so popular today. Hello Kitty is probably the most recognized character in this artistic style. Those big round eyes, sweet cheeks and happy little smiles is the "Cute" look for our line of "Kawaii Treatkins."


Doughy Dunker Treatkins


 Each Kawaii Treatkins design includes all the svg cutting files, a full color printable image, perfect for print and cut, and also a black and white digi line drawing. 


Popsie Twin Treatkins


Kristin used the printable images for the front of these colorful cards. Each image comes in high quality 300 dpi jpg. 


Look for Kawaii Treatkins Gallery 2
with more inspirational card ideas coming next.
 

9 Quick Card Inspirations

Sometimes you just need a quick bit of inspiration for last minute cards. Here are 9 cards ready to cut and assemble. Just pick your papers, stamp on a greeting if needed and there you go. You’ll be done in no time. Don’t hesitate to dress them up even more with ribbons, bling, paper flowers and more.


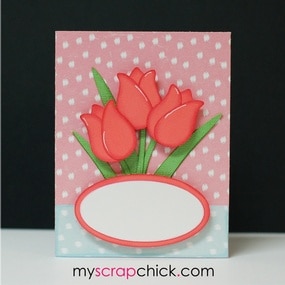
Fresh Tulip Bouquet Card


Brighten someone’s day with a bright bouquet. Room to add a stamped or hand-lettered message on front.


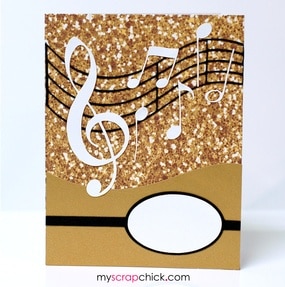
Musical Notes Handmade Card

These musical notes dance across the front of the card. Share a message with the song that’s in your heart.


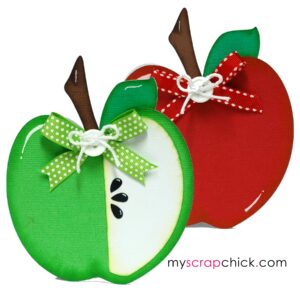
Fresh Apple Cards


Use it with or without the fresh slice and seeds. U-Pick Always in season.

.

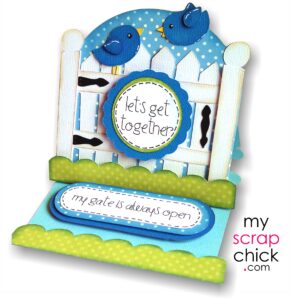
Birds at Garden Card saying Hi


2 little birds meeting at the garden gate is a good theme to use for friendship, keeping in touch, new neighbors and encouragement.


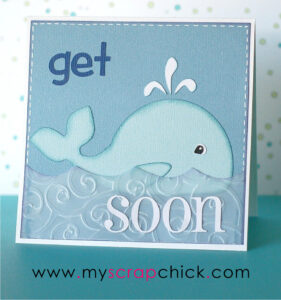
Get Whale Soon


A light hearted play on words and suitable for any age. The playful whale sits in a layer of waves and brings “Get Whale” greetings.


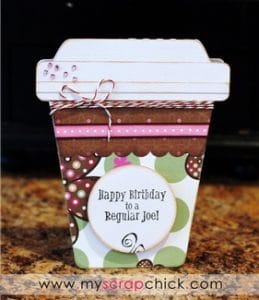
Latte Cup


A shape card sure to perk up a friend or co-worker. Perfect for any coffee lover and latte fans.


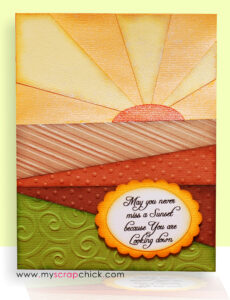
Sunset (or Sunrise) Card


Layers of colored cardstock create a beautiful sunrise or peaceful sunset. Let your imagination play with the use of different types of prints and papers. Card is an A2 size.


Lady Bug


A 5″ square card that is super simple and quick to create. The Ladybug card design is a colorful addition to your spring cards.


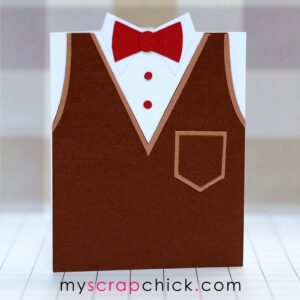
Sweater Vest Card


A side folding A2 card for the men and boys in your life.


Join us in our MyScrapChick Makers Group on Facebook and see what other papercrafters are sharing. 

Popular Cards for Teachers

We all like to know that we are appreciated from time to time. Especially when we put our heart and soul into what we are doing. Big expensive gifts are nice too, but often a heartfelt card that shows you took the time and effort to express your thanks is even better.

We have 2 cards that are really popular for those special teachers in your child's life. The
School Paper Easel Card and The Teacher's Desk Easel Card.


School Paper Easel Card


The fun thing with these easel cards is they display beautifully on a shelf and are a perfect fit to a classroom decor. But it's when you add your personal note of thanks on the base that it becomes a treasured keepsake for the teacher.

Teachers Desk Easel Card


In your note you might want to add specific memories or special help that the teacher provided. If you child looked forward to school everyday, saw great improvement in a particular area, those are nice things to include also. 
The School Paper Easel Card


 The Teacher's Desk Easel Card


A Big Bouquet of Garden BUGS!


Send a hug in bug bouquet.
Who doesn't love bouquets of flowers, plants with cute pokes and encouraging notes tucked in among a cute arrangement of....BUGS! You might even add some paper flowers and make it the perfect summertime hostess gift. 


These goofy little garden critters are only to happy to join you at your BBQ, picnic or patio. And I promise they don't eat much either.


 Just tuck them in a plant or mason jar filled with shred.  They're guaranteed to bring smiles to the table.


Bugs and photos by Kristin Courtney

See some other ideas for making paper bouquets and using straws as colorful picks.


Find the each of the bugs here...

New Paper Pop Up Photo Frames

Sometimes a great idea comes from trying to solve a personal need. I've been restyling my office/craft space and have long wanted a classy way to display all the random photos of kids and grandkids.  


These look so real your friends will have to pick them up and touch them to believe they are actually made out of cardstock. My friends did!

I needed frames that were sturdy, that didn't look too artsy craftsy and would allow me to change out the photos from time to time. I filled a waste basket full of proto types before hitting on the right method and technique. The simplicity was a huge bonus. And I'm loving that I can make all the frames I need.


 Paper Pop Up Photo Frames


These easy to assemble frames have a 3 dimensional look and don't require a lot of fuss. The use of Pop-Dots gives depth and that hand carved look of a wooden frame. One simple layer of chipboard backing provides the durability. This is a great pattern even if you are handcutting.

 The full color photo tutorial included in the download shows the simple hinge technique for the back layers. It creates an easy way to change the photos whenever you choose, yet the layers remain flat.


 Now I have a abundance of frames and will be making many more to fill my photo shelf. 

Paper Pop Up Photo Frames

My Scrap Chick Belly Box Tutorial

Meet our newest addition to the Belly Box lineup, My Scrap Chick.  She's our thank you gift to all of you after our big Belly Box giveaway on facebook where so many of you helped promote our popular Belly Boxes. We want everyone to win so we came up with this idea to share a belly box for free.


T U T O R I A L  for Belly Boxes....

Cut out all your pattern pieces. Pre-fold all the score lines for the box back and box front.  The box back will be a valley fold, the box front will be all mountain folds.


Now is a good time to ink the edges if you plan to. After inking I find it easiest to add all the parts and pieces to front and back sections of the box before putting them together. This allows me to work with the sections laying flat on my surface,
 

Once the front and back are decorated with the parts, flip the box front (belly) over as shown. The decorated side of the box will be face down. Add glue to the inside box bottom then attach the front flap of box back.


Now your box should be one piece as shown above and you are ready to glue the side tabs. This is a good time to re-crease all the folds and tabs before glueing.


Flip the entire box over as shown and add glue to the side tabs
 

Fold up the sides and the belly front and adhere tabs to box front. Then do the same with the tabs for back of box.


And now your box is ready to fill with goodies.


Now keep in mind, we just love the pink and black but this cute chick would be cute in any color you like. It's fun too, to mix things up with printed papers. Whatever you choose, have fun!!

My Scrap Chick Belly Box is available as a Free Download


No more white edges on print and cut images.

Print and cut images are a great time saver and fun option for paper crafters. They work great as embellishments or as the focal point of handmade cards, scrapbook pages and party decor.
 
 
We're all passionate about making our cards and projects look just perfect. Here's a little trick to help hide all those white cut marks along the edge and create a polished look. This is especially helpful when you plan to add your print and cut image to a dark background.
 
This is also a  really useful technique for those times your cutting machine leaves a bit of a white outline. It will save a lot of ink and paper not having to recut.

 
The image above is a print and cut with a brown outline. You can see the white edges that look prominent against a dark background.  And on the tip of the cone you can also see where I left a bit of a white outline. Below shows the same image after applying the quick fix. 


All the white cut marks disappear. Even the tip of the cone where there was white left along my cutting outline is now gone quick as a wink.
 

And here's the easy fix.....

 Use a copic marker or any colored marker with a bullet point to do this. Pick a color that matches closely to the image's outline. The Kawaii images I'm using here have brown outlines so I chose a brown copic marker.  Run the edge of marker around the edge of the image.

 
Using the wide edge of the marker lets you quickly run along, coloring the edges. The fine tip of the bullet point is great for getting in the corners and small spaces.
 
**I always work from the back of the print and cut so I have more control. This also helps prevent getting accidental marks on the front.


 Use this easy fix anytime you want to add a beautiful finished look to your print and cut images.
 
Cutting files used here are from MyScrapChick's  Kawaii Treatkins™


Enjoy!